There are three big "Ouch" moments for beginner email coders that you've probably got yourself over already (if not, check out the fundamental differences between web HTML and email HTML): external resources are mostly banned from email templates, you need to use tables for everything and last but not least - you have to inline your CSS styles. In this article, we'll be concerned with the why&how of the last piece.
You may also very well know that the must of CSS inlining has changed a lot since Gmail started to support the <style> tag. However, this technique is still widely used with regional webmail clients and some old Android devices' native mail app or old Gmail apps. Inlining is also a nice option to be used for complex layouts and it can be fundamental for progressive enhancement techniques as well.
So having settled on that it's important, let's learn about the available online and command line tools that make it possible.
Through the article, we'll discuss various tools, their advantages, and their disadvantages too. The goal is that after reading this post, you'll feel comfortable to use them and your senses will be sharpened to spot any possible flaws there might occur.
CSS Inlining in General
Inlining is a widely used method for converting embedded and external CSS style declarations into more reliable email code. You can see it resembled in the latest Email on Acid's last yearly collection likewise. It's a great way to support older or less developed email clients.
There's an ongoing debate about that it is advisable to drop inline styles in the future - we can conclude that it still depends on the email client list the end-users use.
Borrowing the template from our last tutorial about using the Sass preprocessor for email coding we can compare the embedded...
and inlined ...

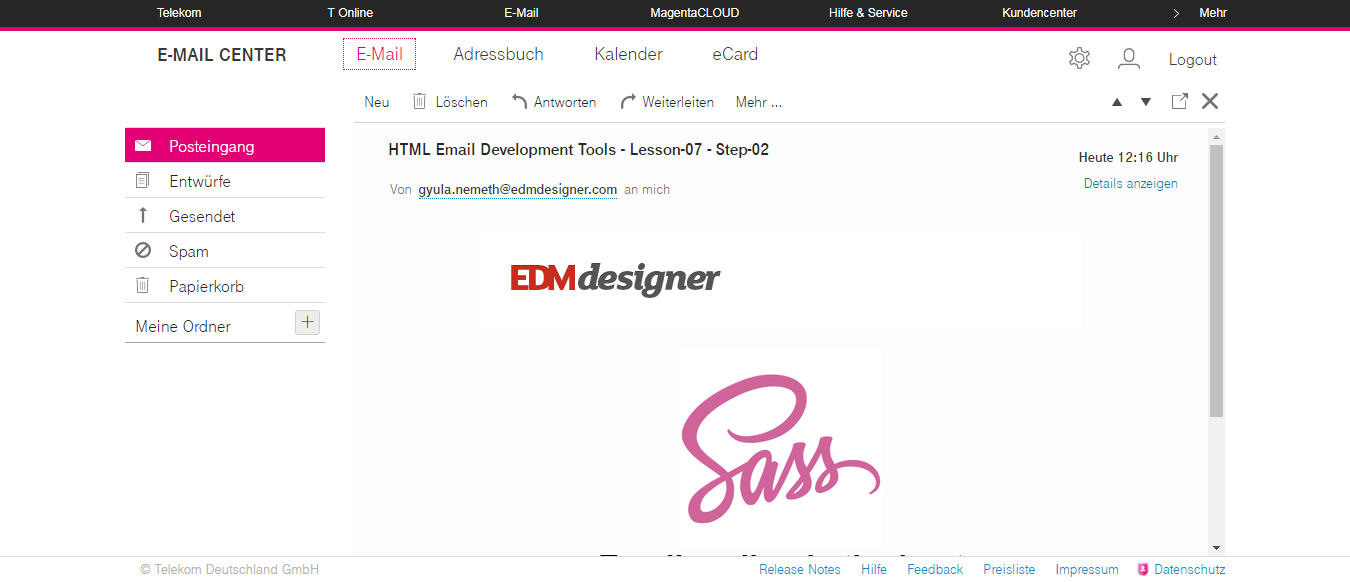
versions of the same template. Here the previews are taken from T-Online.de, which clearly shows that if that is an important client for you, then you need to use inline styles to support it. Word-based Outlooks and different versions of Lotus Notes also benefit from inlined styles.
There are many email coders, who inline CSS styles manually, but it's easy to see that this method is very time consuming and error-prone. Using CSS inliners can help a lot with this aspect. But is there a perfect tool for this process?
Well, you have to decide that for yourself. Different tools have different strengths and weaknesses, and your goal and the end result will determine the true answer.
Based on Julie Ng's article we'll consider the following pre-requisites for CSS inliners:
- not to change our HTML,
- not to remove conditional comments,
- not to concatenate multiple CSS properties into shorthand and
- to only inline and include the CSS specified, but not others
Bear these in mind for the upcoming sections and let's dive deep.
Getting Started with CSS Inliner Tools
If you search for inliner tools online you'll find that there are 4 other options to manual inlining:
- online services, like Litmus's Putsmail, Mailchimp Inliner, Zurb Foundation's CSS Inliner and Campaing Monitor's Inliner.cm
- APIs where you send the HTML & CSS to receive the inlined version of your document
- command line tools like ruby gems and globally installed NPM packages
- CSS inliners available through task runner plugins
Next, we'll see examples of the options above.
Command-Line CSS Inliners
First, we start off with the simplest tool possible, but you'll see that the end results will show it does an amazing job. The tool is called Inlining and it's available through Github and the NodeJS package manager.
The styles we inline needs to be in a separate CSS file. We'll apply the following during the inlining of the CSS:
      body, p {
        margin: 0;
        padding: 0;
        margin-bottom: 0;
        -webkit-text-size-adjust: none;
        -ms-text-size-adjust: none; }

      table {
        border-spacing: 0;
        mso-table-lspace: 0pt;
        mso-table-rspace: 0pt; }
        table td {
          border-collapse: collapse; }

      .ExternalClass,
      .ExternalClass p,
      .ExternalClass span,
      .ExternalClass font,
      .ExternalClass td,
      .ExternalClass div {
        line-height: 100%; }

      .ReadMsgBody {
        width: 100%; }

      img {
        -ms-interpolation-mode: bicubic; }

      p,
      h1,
      h2,
      h3,
      h4,
      h5,
      h6 {
        font-family: Arial; }

      /* default font sizes */
      h1 {
        font-size: 28px;
        line-height: 32px;
        padding-top: 10px;
        padding-bottom: 24px; }

 ...

    Additional heading and paragraph styles

 ...

      .container {
        width: 600px; }

      .hero {
        background-color: #71b47b;
        color: black; }
        .hero .alternate-background {
          background-color: #b471aa; }
        .hero .col33 {
          width: 33%; }
        .hero .col67 {
          width: 67%; }
        .hero .col50 {
          width: 50%; }

      @media only screen and (max-width: 599px) {
        .container, .col33, .col67, .col50 {
          width: 100% !important; } }
      .button, .button-primary, .button-secondary {
        font-family: sans-serif;
        font-size: 13px;
        font-weight: bold;
        text-align: center;
        text-decoration: none;
        display: inline-block;
        -webkit-text-size-adjust: none;
        border: 1px solid #1e3650;
        border-radius: 4px;
        background-color: #ccdd22;
        color: #ffffff;
        width: 200px;
        line-height: 40px; }
        .button-primary {
          background-color: #ffbbcc;
          color: #ffffff;
          width: 250px;
          line-height: 50px; }
        .button-secondary {
          background-color: #7733cc;
          color: #ffffff;
          width: 150px;
          line-height: 30px; }
In a previous tutorial we already introduced the NodeJS ecosystem and how to install NPM packages, having a glance at that previous post and following the installation steps:
npm install -g inlining
you should be able to set up Inlining easily.
If you run into issues that you can't solve, head to the comment section below the post, we'll help you out.
As you install it globally you can run the following in the terminal inlining input.html >output.html to inline styles. The output of the processed input.html will be pushed into a new output.html file. Using our test template we'll receive the HTML below:
<!DOCTYPE html><html><head>
    <title>One column layout</title>
<link>

<style>/* default font sizes */

@media only screen and (max-width: 599px) {
  .container, .col33, .col67, .col50 {
    width: 100% !important; } }</style></head>

<body style="margin:0;padding:0;margin-bottom:0;-webkit-text-size-adjust:none;-ms-text-size-adjust:none;background-color:#F4F4F4;">
    <table width="100%" cellpadding="0" cellspacing="0" style="border-spacing:0;mso-table-lspace:0pt;mso-table-rspace:0pt;min-width:100%;">
        <tbody><tr>
            <td width="100%" style="border-collapse:collapse;min-width:100%;">
                <center>
                    <table class="container" cellpadding="0" cellspacing="0" width="600" style="border-spacing:0;mso-table-lspace:0pt;mso-table-rspace:0pt;width:600px;margin:0 auto;">
                        <tbody><tr>
                            <td width="100%" style="border-collapse:collapse;text-align:left;">

                                <!-- header with image -->
                                <table width="100%" cellpadding="0" cellspacing="0" style="border-spacing:0;mso-table-lspace:0pt;mso-table-rspace:0pt;min-width:100%;">
                                    <tbody><tr>
                                        <td width="100%" style="border-collapse:collapse;min-width:100%;background-color:#FFFFFF;color:#000000;padding:30px;">
                                            <img alt="wonderful EDM logo" src="https://edmdesigner.github.io/modern-html-email-tutorial/lesson03/img/logo.png" width="210" style="-ms-interpolation-mode:bicubic;display: block;">
                                        </td>
                                    </tr>
                                </tbody></table>

                                <table class="hero" width="100%" cellpadding="0" cellspacing="0" style="border-spacing:0;mso-table-lspace:0pt;mso-table-rspace:0pt;background-color:#71b47b;color:black;min-width:100%; ">
                                    <tbody><tr>
                                        <td width="100%" style="border-collapse:collapse;min-width:100%;padding:20px;">

                                            <!-- Hero image -->
                                            <table class="col33" align="left" cellpadding="0" cellspacing="0" border="0" width="100%" style="border-spacing:0;mso-table-lspace:0pt;mso-table-rspace:0pt;width:33%;">
                                                <tbody><tr>
                                                    <td width="100%" align="center" style="border-collapse:collapse;">
                                                        <img alt="wonderful Sass logo" src="https://pbs.twimg.com/profile_images/583681608269471744/jCR2zNJV_200x200.png" style="-ms-interpolation-mode:bicubic;display: block; max-width: 100%;">
                                                    </td>
                                                </tr>
                                            </tbody></table>

                                            <!-- H1 -->
                                            <table class="col67 alternate-background" align="left" cellpadding="0" cellspacing="0" border="0" width="100%" style="border-spacing:0;mso-table-lspace:0pt;mso-table-rspace:0pt;background-color:#b471aa;width:67%;">
                                                <tbody><tr>
                                                    <td width="100%" style="border-collapse:collapse;">
                                                        <!-- H1 -->
                                                        <table cellpadding="0" cellspacing="0" border="0" width="100%" style="border-spacing:0;mso-table-lspace:0pt;mso-table-rspace:0pt;">
                                                            <tbody><tr>
                                                                <td align="center" style="border-collapse:collapse;">
                                                                    <h1 style="font-family:Arial;font-size:28px;line-height:32px;padding-top:10px;padding-bottom:24px;">
                                                                        Email coding is the best
                                                                    </h1>
                                                                </td>
                                                            </tr>
                                                        </tbody></table>
                                                    </td>
                                                </tr>
                                            </tbody></table>

           ....

                                            <!-- Button -->
                                            <table class="col67" align="left" cellpadding="0" cellspacing="0" border="0" width="100%" style="border-spacing:0;mso-table-lspace:0pt;mso-table-rspace:0pt;width:67%;">
                                                <tbody><tr>
                                                    <td width="100%" style="border-collapse:collapse;">
                                                        <table cellpadding="0" cellspacing="0" border="0" width="100%" style="border-spacing:0;mso-table-lspace:0pt;mso-table-rspace:0pt;">
                                                            <tbody><tr>
                                                                <td align="center" style="border-collapse:collapse;">
                                                                    <div>
                                                                        <a class="button-secondary" href="https://edmdesigner.com" target="_blank" style="font-family:sans-serif;font-size:13px;font-weight:bold;text-align:center;text-decoration:none;display:inline-block;-webkit-text-size-adjust:none;border:1px solid #1e3650;border-radius:4px;background-color:#ccdd22;color:#ffffff;width:200px;line-height:40px;background-color:#7733cc;color:#ffffff;width:150px;line-height:30px;">
                                                                            Show me a button!
                                                                        </a>
                                                                    </div>
                                                                </td>
                                                            </tr>
                                                        </tbody></table>
                                                    </td>
                                                </tr>
                                            </tbody></table>

                                        </td>
                                    </tr>
                                </tbody></table>

                                <!-- footer -->
                                <table width="100%" cellpadding="0" cellspacing="0" style="border-spacing:0;mso-table-lspace:0pt;mso-table-rspace:0pt;min-width:100%;">
                                    <tbody><tr>
                                        <td width="100%" style="border-collapse:collapse;min-width:100%;background-color:#58585A;color:#FFFFFF;padding:30px;">
                                            <p style="margin:0;padding:0;margin-bottom:0;-webkit-text-size-adjust:none;-ms-text-size-adjust:none;font-family:Arial;font-size:17px;line-height:20px;padding-top:6px;padding-bottom:15px;font-size:16px;line-height:20px;font-family:Georgia,Arial,sans-serif;text-align:center;">2017 @ COPYRIGHT - EDMDESIGNER</p>
                                        </td>
                                    </tr>
                                </tbody></table>

                            </td>
                        </tr>
                    </tbody></table>
                </center>
            </td>
        </tr>
    </tbody></table>


</body></html>
There are a few things about this tool, I should mention:
- it preserves the media query in the style tag - you'll see that not all tool does so
- inlines well the
widthproperties of the layout classescol67,col33 - adds
<tbody>tag to complete thetablemarkup - it removes unknown CSS classes, like
ExternalClassdeclaration
Examining the Litmus previews we can determine that the correct fluid layout is applied in most mobile email clients, while the desktop view shows on desktop and webmail clients. The tool doesn't offer any configuration to customize the inlining process, but I'm pretty satisfied with the results. There are two negative aspects I run into using the tool: 1, you can only use it to inline CSS from external stylesheet 2, it uses a tabulation that makes the template harder to modify after inlining. All-in-all I can recommend it whole-heartedly.
Setting Up an Automation Tool
When I wanted to test the various tools for the inlining process, soon it turned out that the only effective approach is if I gather and run them together via a scripting language. Though any solution would work, there are special tools, so-called task runners, that facilitate this job. This way I just need to modify the HTML, CSS and the CSS inliner tools' configurations, other parts of the procedure are handled for me.
Task runners are tools to make regularly occurring tasks automated. The usual setup is based on a configuration file, specific for the task runner that holds all the defined tasks to carry out on a simple command.
Our choice, Gulp, is a frequently used, performant JavaScript task runner, and under a simple default command, we'll set up all the different CSS inliner tools' run commands. The installation is quite the same as you've seen in the section about Inlining.
We'll zoom-in on task automation in an upcoming article creating an automated email development framework. On the other hand, it seems useful to warm you up a bit and introduce one popular JavaScript task runner for the sake of this post anyway. Let's Gulp!
You can download and inspect my recommended project setup from Github, but I'll quickly sum up how it works. If you see any way to improve that, I also welcome comments about it.
In our project will have:
- An
input.htmlthat contains the email template markup and either a<link>tag to themain.csscontaining the styles for the template, or the styles embedded into the<style>tag, when we want to test how that works - A
gulpfile.js, having all the inlining tasks we want - NPM related files and folder:
package.jsonfile andnode_modulesfolder - these will house the gulp util packages (like gulp-rename to customize the output file name) and CSS inliner packages available through NPM - I opened separate JavaScript files for each CSS inliner tool that's not set up to be run with Gulp directly
- A
resultsfolder that we'll hold the generated inlined HTML's
All of these together look as follows:
        inliner-tasks/
            |_ node_modules/
            |
            |_ results/
            |   |
            |   |_<inlined result files>
            |
            |
            |_ input.html
            |
            |_ gulpfile.js
            |
            |_ package.json
So let's navigate to our working folder on the terminal and install everything we'll use:
We'll need to npm install --save gulp-premailer gulp-juice gulp-email-builder.
After it's completed, let's start to fill up the gulpfile. I'm only showing the task for one inliner to save space.
        // REQUIRING NECESSARY PACKAGES
        var gulp = require('gulp');
        // this package let's us run command-line
        // commands from the Gulp JavaScript file
        var run = require("gulp-run-command").default;
        var rename = require("gulp-rename");

        // INLINER PACKAGES
        // ========================================
        var gulpPremailer = require("gulp-premailer");
        var gulpJuice = require("premailer-gulp-juice");
        var emailBuilder = require('gulp-email-builder');

        // FILE PATHS
        // ========================================
        var input = "input.html";
        var output = "results/";

        // INLINER TASKS
        // ========================================

        // Premailer
        var premailerRunFile = "premailer/pre.rb"
        var rubyCommand = "ruby ";

        var premailer = rubyCommand + premailerRunFile;

        // Gulp-premailer
        gulp.task("gPremailer", function () {
        gulp.src(input)
            .pipe(gulpPremailer())
            .pipe(rename("gpremailer.html"))
            .pipe(gulp.dest(output));
        });

        var gPremailer = "gulp gPremailer";

        // DEFAULT TASK
        // ========================================
        gulp.task("default", run([
             gPremailer
        ]));
The above content, which makes a valid gulfile.js, runnable with the gulp command:
- requires all the necessary packages to the operations defined for the tasks
- provides some configuration, like the input and output files and folders
- holds the task names and the function to implement, when the given task is run.
Let's try it out and run gulp default in the terminal!
This is our project setup. I hope it makes sense to you. In the next sections, I'll show you how the inlined versions differ for the same template and give you an overview on some of the available configurations for each tool. I'll point out the key differences and implementation specifics you must consider if you decide to use inliners.
Gulp CSS Inliner Plugins
As in the previous step, we run our "default" Gulp task, the results/ folder is filled with output already. To be able to compare these results, I found this online tool that enables great opportunity to visually inspect differences between two documents. Before we get into the details, you may want to check out the working files of the project.
Premailer-Gulp-Juice
In this section, the output HTML of premailer-gulp-juice package will be our reference, as it keeps the media query in the head and also inlines the CSS from the class declarations correctly. Examining the previews, we can observe that they are almost identical to the ones we have seen with Inlining. One unexpected fix Juice adds to the original template: it completes td tags with align="left" attribute.
A quick note: by default this Juice package encodes the image to Base64 code, which is only seen with the Gulp wrapper package.
Gulp-Email-Builder
The Gulp-Email-Builder package delivers a lot, not just considering inlining: it also offers means of sending out email tests and running Litmus previous directly from our script file. However these are out of the scope of this tutorial, so I just sum up the options of customization and differences to the output of the Juice package.
Here are the things to consider when opting for using this inliner:
- It lets you select from multiple external stylesheets, the ones to inline, the ones to embed and you can also select stylesheets to ignore. That can be a great option for development.
- There are options for customization about the inlining process as well, like selecting to
normalizeWhitespaceor todecodeEntitiesavailable through the internally usedcheeriopackage. - It removes the media query but applies its content overwriting
widthrelated properties. This is not desired, and you'll see that it breaks the template on many clients.
You can access the Litmus previews with this tool following this link.
Gulp-Premailer
Gulp-Premailer is really similar to the previously shown Gulp-Email-Builder. However, it's a changing difference using it that it inlines the width properties from the CSS declarations and it also embeds the media query and ExternalClass class definitions. Premailer also offers an API functionality through NPM, so there's an option to set up your script file to send over the HTML and CSS to their API and you'll receive the inlined email HTML in your code. They also offer an online tool, which you may consider trying.
You can access the Litmus previews with this tool following this link.
Online CSS Inliner Services
The following tools are able to smartly take embedded styles from the head element of the HTML document and apply them either in the <body> tag in the appropriate HTML elements as inline styles. We'll see different behavior around how they work. The tools are not consistent in their job and if you are not careful some unwanted changes may be made to your project. We're going to see these next.
I tested 4 online inliner services thoroughly from the most well-respected companies in the email marketing industry. Namely, I used the inliner services of Litmus (Putsmail), Mailchimp, Zurb and Campaing Monitor.
You can find the HTML results after CSS inlining among the working files.(https://github.com/EDMdesigner/html-email-development-tools/tree/master/lesson-08/online-tool-tests)
These tools had similarities and more importantly very similar differences as well. I'll gather and explain what kind of unexpected behavior I've found. I'll summarize these below:
Using external stylesheets:
- Litmus's Putsmail tool and Zurb's tool doesn't handle external stylesheets, these resources are stripped totally and no inlining is done. The HTML is processed and what the tool offers is applied to the document. If you want to use external stylesheets Mailchimp's and Campaign Monitor's online tools are better solutions for you. They do the inlining, and also in Mailchimp the
<link>tag is also included, while Campaign Monitor adds all the respective CSS to the<style>tag. That means a duplication of all styles. On the other hand, this way the media queries are kept, which keeps our layout as we wanted.
Using embedded styles:
- As it turns out, all tools inline multi-column pattern's defined width values. First I thought this would be a problem, but as our previous research showed on the Drop Calc Method (https://blog.edmdesigner.com/the-drop-calc-method-to-create-responsive-html-emails/), these inline styles are overwritten from the media query class declarations.
- Mailchimp and Campaign Monitor keep all embedded styles, which makes: 1, huge duplication on code 2, client specific targeting and smart hacks are also kept (like Margin Hack
p { Margin: 0px }recommended by Paul Airy. The other tools strip out the unknown CSS classes and properties.
Last but not least, there are tool specific characteristics worth mentioning:
- Zurb stripps every HTML comments, but MSO conditional comments and also changes the HTML doctype to the following:
<!DOCTYPE html PUBLIC "-//W3C//DTD XHTML 1.0 Strict//EN" "http://www.w3.org/TR/xhtml1/DTD/xhtml1-strict.dtd"><html xmlns="http://www.w3.org/1999/xhtml"> - Putsmail and Mailchimp removed the closing
<img>tag, which is strange and not valid HTML - Campaign Monitor separates
paddingandmarginshorthands to their full form
Summary
We started off by discussing why CSS inlining is important for email developers and showing that it may not be necessary in the future, but it still makes sense in cases when the email client list to support demands it.
We saw a broad spectrum of available options for the task: online tools, command line tools, APIs and task runner plugins. We introduced the topic of task automation and learned how it can be used in the inlining process. We tested a few of the most well-known options through Gulp task runner and inspected the various settings and additional features available with these CSS inliners.
In the second part of the article, we observed the output of online CSS inliner tools and we saw a few interesting specialty with these tools. The most important takeaway was that considering complex layout techniques, the ones that build on inline styles and the style tag with media queries, these tools can break the layout.
To puzzle your mind, there are other techniques that can overcome this limitation. By using the method of abstract description you have more control over the most important layout declarations. If you don't have the faintest idea about what they are, no worries, we'll show that in the next article. We'll talk about templating languages and the ES2015 template strings. Thanks for joining us! See you next time as well.