Email HTML has always lacked the presence of scripts. No interaction, no DOM manipulation, no fun. Of course, this is a bold statement to make, but if you know some JavaScript, you may have had the feeling that you spent so many days, nights and hours of your spare time to learn it, and what for? You have to forget about it when it comes to HTML email. But that's not necessarily true. Today we are going to get relief and use JavaScript for creating HTML emails.
This article is a chapter of the HTML Email Development Tools series. The aim of the series is to improve our email development workflow. We have so many thoughts on the possibilities. We're searching for the best ways all the time. In our first post, we showed code editor features with Sublime Text, for example saving snippets. You can check out below what we wish to cover in the upcoming articles.
In this post, we'll use some JavaScript for generating HTML Email templates. Don't worry if you aren't an expert; we'll progress in a step-by-step manner. In the first part, we gather the basics of scripting and show you why we chose JavaScript for our example. Next, we'll put together the pieces and code an example, which generates a table-based email layout from configuration lists. In the end, we will learn how to run the script in the command line to create the layout and push it into an HTML file.
The groundwork we lay down in this blog post will be used in future posts. We'll use scripting in the post about task-automation and probably in many more. If you don't want to miss them, please subscribe.
Getting Ready for Writing Executable Scripts
In this chapter, we go over all the theoretical knowledge that is crucial to get started. The topics we cover are: scripting in general, Javascript, Node.js, and last but not least the command line. Using these tools we can write really complex programs, but also simple scripts to support email development. In order to make the fundamentals easier to digest, we provide links at the end of each section enabling quick navigation back and forth between theory and practice.
Scripting in General
A script is a series of instructions for a computer program to follow. It's created with the purpose of executing of a custom behavior. A language is considered a scripting language if it can be interpreted by a program without compiling it previously, or — in the case of JavaScript in the browser — it is compiled on the fly (JIT compilation).
There are various languages available for the task. Standard examples exist for specific environments. According to Wikipedia, Bash is the default for Unix-like operating systems; ECMAScript (JavaScript), for web browsers; and Visual Basic for Applications (VBA) is for Microsoft Office applications, while Python is a commonly used, general-purpose language.
The three main reasons you would write a script are:
- A single task is repeated several times (eg. compressing a file for size optimization)
- Time-consuming operations for humans (eg. reading through a huge document to find words matching a text pattern)
- You wish to define a general term for a set of instructions. You reference the term once, and all the instructions are implemented by that (eg. a "create project" term can be responsible for creating and naming a new project folder, creating and opening some default project files populated with pre-defined entries, etc.)
If you encounter all of the above, you would use a library to manage the complex, end-to-end processes. It's called task automation and we're going to have an entire article about that later.
For now, let's just see valuable, introductory use cases. Generating components and custom layouts for the email templates are good examples from email development. When you build dozens of similar templates, you probably need a nice little script to help you out.
Jump to the article's script example, if you can't wait to see it in action.
In the next section, we're going to continue the preparations by diving into the JavaScript universe and learning about Node.js and NPM.
Javascript & Node.js
There are various languages to help you interact with your computer and give it your list of instructions. Nonetheless, your choice should be based on performance, good support and widespread use in the developer community. Because of these points, we selected JavaScript. In the following paragraphs, we try to exhaust some of the important benefits.
Javascript is referred as the language of the web. The reason is that it is interpreted by every browser. Because developers use it so often, the language evolved into a general purpose language over time. It's considered the most popular programming language by StackOverflow's Developer Survey and Github's review.
JavaScript set its foot on the server-side with Node.js, but you can use it on your computer as well. Great applications were written in it: code editors like Brackets or Atom and operating systems using Node.js. If you haven't come across with it yet, Node.js is an open-source JavaScript run-time environment for executing JavaScript code. The engine behind Node is the same "V8 JavaScript engine" that powers Chrome browsers (and many more).
The Node.js runtime is shipped with the Node Package Manager (NPM), which constitutes the world largest software registry. The NPM is an amazing tool to include open source libraries into your code, or if you developed something new with high community value, you can make it public for others. Also, it's a great way to share the common libraries, developed within the company.
Before starting to code, you need to install Node. On their main page, they detect your operating system and serve the corresponding download bundles.
Go to the example run in Node to get a feeling on where this article is heading.
The Command Line
The last concept we need to grasp — before we could start scripting for HTML email layouts — is the use of the command line.
The command line is an interface for the computer, like the Graphical User Interface, but it is fully text based. It's a program that takes in text commands and passes them on to the computer's operating system to run. You can run programs, write scripts to automate common tasks, and combine simple commands to handle truly difficult tasks.
On UNIX-based operating systems like Mac OS X or Linux, they often refer to it as the terminal or console (for clarification on the proper terminology check this superuser discussion). On Windows-based systems it's called the Command Prompt.
In our example, we'll use the terminal to install NPM packages and run the scripts written in JavaScript by Node.js. If you need some refresher on how to find the command line, check out the links fitting your operating system:
And below are links on how to use it:
Since Windows has support for Bash - the standard shell program for UNIX-based systems, we'll focus solely on the UNIX-based command line. You can set it up easily for Windows too.
Jump to the command line heavy part of the example project.
Example Script for Layout Generation
In the previous section, we gathered everything necessary for a complex, holistic example. We are going to use the Node Package Manager (NPM) to manage the essential external libraries called the project's dependencies. We'll see how to include them in the script file we write. Then we're going to run the script from the command line. You are really excited now, aren't you? Let's start then!
NPM Init in The Terminal
First, open up the terminal. We begin by creating a new folder for our project with mkdir <projectname>/ command and start the development by initializing the Node Package Manager (NPM). For this, we run npm init. The command creates a package.json file and prompts us with a few questions regarding the project.
After each entry, you need to press enter. The answers are recorded to the package.json file. We left most of them empty, so after completion, it looks like this:
   {
     "name": "table-generator",
     "version": "1.0.0",
     "description": "",
     "main": "index.js",
     "scripts": {
       "test": "echo \"Error: no test specified\" && exit 1"
     },
     "author": "EDMdesigner.com",
     "license": "ISC"
   }
This being taken care of, we install the project dependencies. We need the cheerio package and pretty for this project as the only dependencies. Cheerio parses markup (like HTML) and provides an interface for navigating/manipulating the resulting data structure. This way it helps us selecting and nesting the HTML elements in the example. We install it by running the following: npm install cheerio --save.
We use the same steps to install "pretty", which will make the output HTML look a lot nicer.
By running the command, NPM will:
- Look up its online registry (so you need an Internet connection) and download the code of the specified library
- Create a new folder called
node_moduleson the same level as thepackage.jsonfile is, and copy the code into it - Add the package's name in the package.json file
You can confirm it by opening the package.json file.
The last point in the list is useful because you can track the versions of the project's dependencies and also it makes your code easily usable for others, if you choose to publish your project.
If you need to look up the theory on the terminal from above follow this link.
Writing The Script Itself
Let's discuss a bit, how the program will work. Our goal is to control the layout generation process with just a series of numbers. We'll tell the program to create a layout in the email body with two rows, one column in the first, two columns in the second. For this, we just need to type: <create the layout with these numbers:> 1 2, hit ENTER ... and bam, there it is. How cool is that?
We'll implement the logic in this section. If you wish to check out the layout-generator first, and come back here to the very cool part after, then download the project in .zip format here, unzip the files, and hop on to the next section.
In a Node.js application, one of the first things to do is to require the packages necessary in that particular file. It'll virtually include the code from the selected sub-folder of the node_modules folder, making the public functions of those packages available. Logging events from the Node.js app will surely help you encounter any problems while trying this out.
        var cheerio = require("cheerio");
        var pretty = require("pretty");
Cheerio is a light-weight library inspired by jQuery core, so we initialize it similar to jQuery: on the $ sign. We can use it for easy selection of DOM elements.
The most important task is to abstract the functionalities away into specific methods in the JavaScript file. For this matter, we define the createLayout(){ // code }; and createMultiColumn(columnCount) { //code }; methods. The createLayout function creates the wrapper table and handles the single row - single cell type insertions. The createMultiColumn function is used to create the layout for more than one column. It includes additional table elements with single rows and populates them with the adequate number of table cells. This solution is called the multi-column element.
In the file, Node will read the instructing command line arguments as the "layout configuration list". We'll make it loop through the arguments, and based on their values, it'll either add a row with a single cell or create a multi-column layout.
The code for the createMultiColumn method looks as follows:
	function createMultiColumn(columnCount) {

		var multiColTable = $("<table></table>");
		var tr = $("<tr></tr>");

		multiColTable.append(tr);

        // APPEND TABLE CELLS TO THE CURRENT ROW
        // CORRESPONDING TO THE COLUMN COUNT
		for (var cols = 0; cols < columnCount; cols += 1) {
			var td = $("<td></td>");
			tr.append(td);
		}

		return multiColTable;
	}
You can check out the full source code on Github.
Running The Table-Generator Script
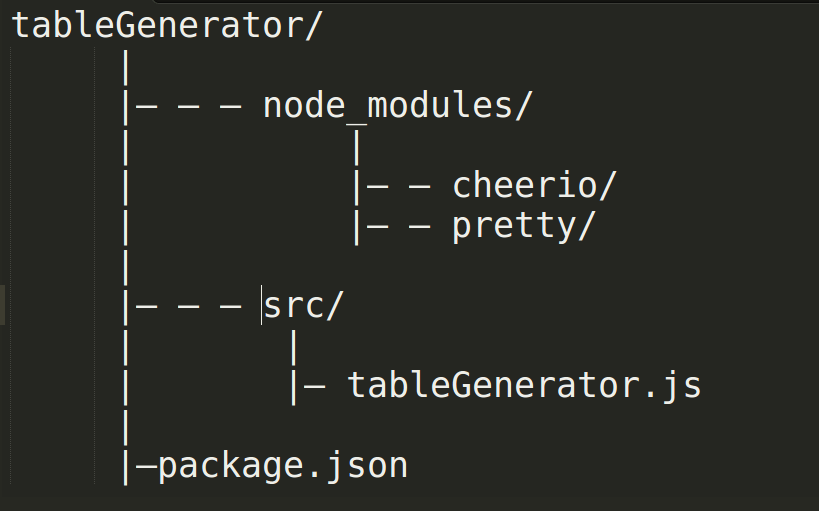
Everything is ready now. If you followed along, the project should look something like this:
First things first, make sure that Node.js is installed. Run node -v in the terminal, and if you see a version number like this v6.x.x that means you are good to go.
You need to navigate to the working files, and run the following:
node tableGenerator.js 1 2 3
and you'll achieve this layout:
	<html>
		<head>

			<style></style>

		</head>
		<body>
			<table>
				<tr>
					<td></td>
				</tr>
				<tr>
					<td>
						<table>
							<tr>
								<td></td>
								<td></td>
							</tr>
						</table>
					</td>
				</tr>
				<tr>
					<td>
						<table>
							<tr>
								<td></td>
								<td></td>
								<td></td>
							</tr>
						</table>
					</td>
				</tr>
			</table>
		</body>
	</html>
Sidenote: it's also possible to configure with the filepath, which file to run. This makes it so the current directory doesn't matter.
Now, we can generate any custom layout running the tableGenerator.js file with Node.js and using a series of numbers. We can take our example one step further by using powerful command line features:
node tableGenerator.js 1 2 3 > index.html
With the > operand, we can direct the console output into an HTML file.
Naturally, this example is quite simple; we just wanted to show the main concepts. A few more lines of code in the JavaScript file could include pre-written styles inside the HTML head or the addition of other components. The sky's the only limit.
If you need to look up the theory on running terminal commands follow this link.
Summary
We started this post by arguing the role of scripting in HTML email development. We wanted you to believe that it is useful in the development workflow. We saw the three reasons behind writing scripts:
- Single task repeated multiple times,
- Multiple tasks intended to execute on a single command
- Time-consuming duties
and identified layout coding as a time-consuming task that's easy to facilitate by scripting. We also discovered tools from the JavaScript universe and learned the underlying theory in the latter half of the first part.
On the basis of our freshly grounded knowledge in general purpose JavaScript (Node.js), we coded a script file. Using the file, we could generate an email layout by a command and a few numbers describing the layout structure. We used the command-line to run the program. Here is a download link for the project's .zip. Feel free to modify it and share it with others. In case you made something clever from it, you shouldn't forget to also share it with us.
We are very proud of you making it 'til the end. This was a little lengthy and advanced article if you haven't written any scripts before, but we deeply believe that this knowledge can build nice template layouts fast. We hope that you agree.
As always, we encourage you to opt-in for the upcoming articles and also share your thoughts and ideas below to make these posts even better.