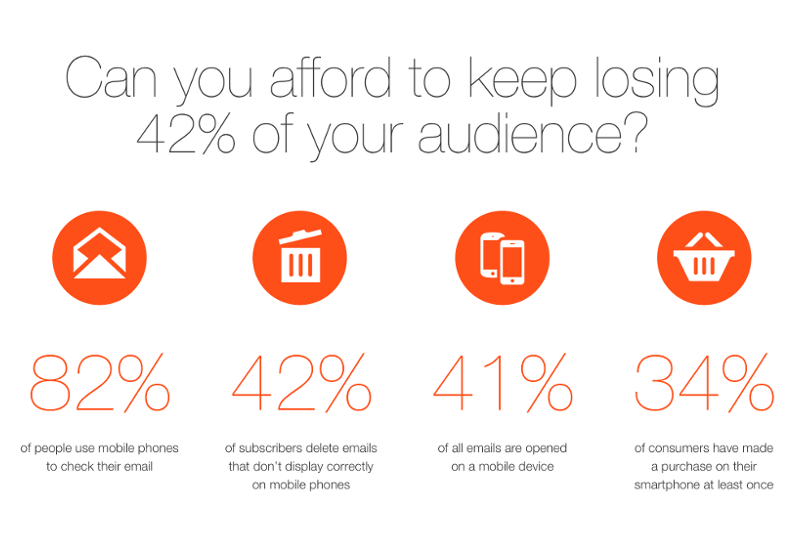
Responsive design is a factor that you need to consider while building applications, sending out emails, and designing templates. If the design looks awful on a small screen, more than half of your customers will feel dejected and the numbers are not going to get better.
Email development has many challenges on it's own. We tackled many of these topics in a previous article series. Imagine receiving a newsletter into your inbox with a broken layout, poor grid system and a microscopic font style that’s impossible to read without zooming in. As the web is being veered off into a mobile first environment, the strategy for designing emails needs to be upgraded.
In this post — written by Cloudinary, a leading SaaS technology company in digital asset management — we will discuss some of the basics things that you need to take care of while creating a responsive email design using a web/mobile application. As a developer, you might have to integrate responsively designed email templates into your application UI or create templates on the fly. This post will teach you how to do that for an application built using React Native.
Why React Native?
React Native, as you might already know, is a popular framework for building cross-platform mobile apps for Android and iOS, which perform as well as a native application. It uses similar technology to that of its web counterpart, ReactJS. Both React and React Native are gaining grounds in terms of user base and popularity. If you’re developing a website and a mobile app for your product, you can reuse some components between React and React Native (for some information about this type of conversion, see this post).
As a developer, you might be asked to integrate responsively designed email templates into your application UI, or to create templates on the fly and send them to a bunch of recipients. You can use an API to send the email to the recipients and that’s the easy part. But building a dynamic front-end layout for sending an email with multiple themes and images might be harder to do.
The steps involved are pretty much similar to that of building a responsive design using CSS. However, with React’s component architecture, you can use use third-party components to compose responsive templates that are dynamic and reusable.
For the purpose of this tutorial, we are going to use create-react-native-package to build a new React Native project.
      npm install create-react-native-app
      create-react-native-app responsive-email
Now that we have that out of the way, let’s see what we can do to make the email responsive.
Create Email Templates using react-html-email Library
There is an awesome library called react-html-email that lets you write reusable component based emails. The library has a renderEmail() method that accepts an input component and renders it into an HTML string. Install the library by running
npm install --save react-html-email
Next, use the following code to generate a very basic email.
      import { Email, Item, A, renderEmail } from 'react-html-email';

      const BasicEmail = () => (

        <Email title='link'>
          <Test> Hi </Test>
          <Item>
            <A href="#" style={{ paddingLeft: 10 }}>Hello Buddy!</A>
          </Item>
        </Email>

      );
        renderEmail(<InlineLink />);
The library exports a few components like Email, Box,Span Item, A and Image. This covers almost all of the basic tags that you’d require in an email. After composing the email template, you can pass it onto renderEmail() to generate the HTML string. Here’s an example output string:
<!DOCTYPE html PUBLIC "-//W3C//DTD XHTML 1.0 Strict//EN" "http://www.w3.org/TR/xhtml1/DTD/xhtml1-strict.dtd"><html lang="en" xmlns="http://www.w3.org/1999/xhtml"><head><meta http-equiv="Content-Type" content="text/html; charset=utf-8"/><meta name="viewport" content="width=device-width, initial-scale=1.0"/><title>link</title></head><body style="width:100%;margin:0;padding:0;-webkit-text-size-adjust:100%;-ms-text-size-adjust:100%"><table width="100%" height="100%" cellPadding="0" cellSpacing="0" border="0" align="left" valign="top"><tbody><tr><td align="center" valign="top"><table width="600" align="center" cellPadding="0" cellSpacing="0" border="0" valign="top"><tbody><div> Test </div><tr><td><a href="#" target="_blank" style="text-decoration:underline;padding-left:10px">Hello Buddy!</a></td></tr></tbody></table></td></tr></tbody></table></body></html>
One of the good things about react-html-email is that it has an inbuilt validator that checks your HTML for compatibility against popular email clients. It returns a warning or an error when a validation check fails. If you ran the above code, you’d get a warning in the console like this:
Warning: Style property `padding-left` supplied to `A`,
in outlook: padding for p, div and a tags is not supported
Add Responsive Design using Media Query
Media queries are important for creating responsive designs. When you have to develop for smaller screens, you can use the @media declaration to specify the viewport of the screen that the style should apply to. Most of the major email clients support media queries and allow the inclusion of query styles in
.The Email component that we created earlier accepts a headCSS prop. You can use this space to declare all the styles that should go into the
section. For instance, if you need to override the font-size to 14px for all devices with screen size 480px or less, you can do something like this: const css = `@media only screen and (max-device-width: 480px) {
font-size: 14px !important;
text-align: center !important;
}`.trim()
If you forget to add the the !important rule, other inline styles could override these declarations.
Now, add the headCSS prop to the Email component.
      <Email title="Test Email" headCSS={css}>
      //Removed for Brevity
      </Email>
Optimize Images for Mobile
Rendering optimized images based on screen size helps you create an attractive layout. For example, if you need a background image for the header, you can use a fluid image layout that looks like this.
      @media only screen and (max-device-width: 480px) {
      .header {
          background-image: url(https://www.example.com/image.png) !important;
          background-size: cover;
          }
      }
You can also stick to the traditional method, such as setting background-size to 100% if you’re not sure about compatibility.
For serving high-resolution images, the actual images will need to be twice their display size. You can use an image uploader component to add React Native images into the mix and then host them in different resolutions in the cloud. Based on screen size, the server will return a resolution of the image that aptly fits the screen size.
Responsiveness using MJML framework
We’d like to introduce you to another approach to automate the process of creating emails. MJML is a framework that was developed to reduce the pain of coding responsive emails. The framework isn’t React Native specific, but most of the features work with the React architecture. Prior to version 4, MJML used React components to render the output HTML and hence was fully compatible.
Being a framework, MJML lets you create reusable components that can be used to create email templates. It has an ecosystem of tools and plugins that you can use to extend the framework’s abilities.
To generate a basic responsive email using MJML, install mjml if you haven’t already, and import the mjml2html API. Create a basic mjml string like the one below, compile it and output it to the console.
      /*
        Compile an mjml string
      */
      const htmlOutput = mjml2html(`
        <mjml>
          <mj-body>
            <mj-section>
              <mj-column>
                <mj-text>
                  Hello World!
                </mj-text>
              </mj-column>
            </mj-section>
          </mj-body>
        </mjml>
      `)


      /*
        Print the responsive HTML*/
      console.log(htmlOutput)
MJML has its own responsive layout and a grid system that complements the layout. The whole email can be composed of multiple sections as shown in the code above. You can read more about the layout structuring in the documentation.
Summary
In this tutorial, we’ve covered some of the common techniques that you can use to compose responsive emails using React components. For building a front-end responsive email solution using React Native, you have multiple open-source tools like react-html-email and MJML that you can import into your project. The former is a small library that you can further customize depending on your requirements, whereas MJML is a full-fledged framework with focus on responsiveness.
Experiment with both the options and choose the one which works for you. If you have alternate ideas for integrating responsive email templates into a React Native project, share them in the comments!