Most developers who started off their programming careers before 2010 and had an interest in web development, most-likely encountered PHP as their first server-side scripting language. PHP was very, very popular back then. The easiest way to start a blog or a website was through content management systems (CMS) running on PHP, like Wordpress or Joomla, which boosted popularity even more. The language is still popular with great impact and a lot of options for different applications.
As the technology is used widely and many developers at email marketing agencies around the world understand the language well, we had the idea to gather as much information about sending email templates with PHP code as possible.
Our goal at EDMdesigner.com is to make eye-catching, bulletproof HTML email templates available for everyone. The EDMdesigner blog supports this mission by helping fellow developers get more educated in the field of email development.
By reading through this guide, you'll learn about how to write PHP code to send transactional and HTML emails. There are built-in methods, PHP extension packages, and we'll cover email delivery services integrable in PHP code in an upcoming article. They differ in flexibility and additional features. Learning about these options open the door to quick HTML email design testing capabilities during development. Reading this article will help you gain an understanding of the considerations when selecting the service suitable to your needs.
Installing PHP
The first step of bootstrapping any PHP code run project is to install PHP. That starts with fetching the necessary download bundle. Since our goal is to run PHP scripts and send transactional and HTML email templates, it's sufficient to have PHP installed on our system and, we don't need to additionally configure a server. For developers using Linux distributions the quickest setup may be executed by running the following in the terminal:
sudo add-apt-repository ppa:ondrej/php
sudo apt-get update
sudo apt-get install php7.0-cli // or other desired PHP version
You can read the detailed installation steps on the Launchpad web page.
After the successful completion of this process, you can test if everything works correctly with a simple script:
<?php
   echo "I write PHP code like a PRO!
         Soon I'll be able to send out emails
         using it as well.";
?>
Place the above code in a test.php file, navigate to the folder where you created the file in the command line and run php ./test.php. This amazing script will print your message to the console. Well done!
Sending Email with Built-In Mail Function
The most basic way to send an email using PHP is the built-in mail() method. The only compulsory parts are the $to, $subject, $email_body variables. If you omit any of them you'll see the following sad little error log: PHP Warning: mail() expects at least 3 parameters, 2 given ..., warning you about your mistake. The least complex implementation of the function would look like this:
        <?php
            $to = "mail@example.com";
            $subject = "Subject of your email";
            $email_body = "The text for the mail...";

            mail($recipient, $subject, $email_body);
        ?>
Let's see what happens, when we run the script! In the tutorial, we think in steps, so I go with running php step-00.php.
The most likely output is the following error: sh: 1: /usr/sbin/sendmail: not found. Now, this is a pity. As part of the installation, to be able to actually send test emails, we need to install the Sendmail Mail Transport Agent (MTA) as a locally accessible mail server. If you type sendmail in the terminal, you'll be notified about the packages that contain this library:
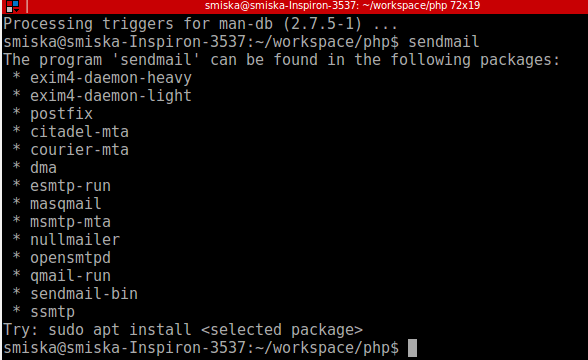
When proceeding with sudo apt install sendmail a lot of updates happen.
Now you can proceed with configuring the default sender's values in the php.ini file. The php.ini file is the place to store runtime variables for PHP and this file includes the SMTP setup, which tells your script about your local web server's configuration.
[mail function]
; For Win32 only.
; http://php.net/smtp
SMTP = localhost
; http://php.net/smtp-port
smtp_port = 25

; For Win32 only.
; http://php.net/sendmail-from
;sendmail_from = me@example.com

; For Unix only.  You may supply arguments as well (default: "sendmail -t -i").
; http://php.net/sendmail-path
;sendmail_path = "/usr/sbin/sendmail -t -i -f info@edmdesigner.com
If you use Unix-based systems, like Linux, you need to uncomment the sendmail_path variable by removing the semicolon from the beginning of the line, so PHP finds your sendmail location. When all the above is done, naturally we try running php step-00.php again. Miraculously the script runs and our first PHP-sent mail arrives. Congrats!
Later we'll see, that we can also choose our email service provider as the mail server and provide the SMTP setup in the script, for example, Gmail's email server.
This is all well and good, however, that's not all the mail() function can do. You can also:
- send complex HTML email templates
- set additional email headers, like (content type, character set)
- provide multiple addresses with comma separated lists
- add attachments to the emails by formatting the message conform to the Multipurpose Internet Mail Extensions (MIME) standard
Following this you may ask 'If I can send rich HTML content with the mail() function, why should I learn about additional ways to send emails?'.
The answer can be found in the user comment section of the PHP docs:
- it's not efficient to bulk-send emails to email lists as the function opens and closes an SMTP socket for each email
- you can only use 70 character long strings, you need to separate the excess with
"\r\n"line-breaks. - you can't set up SMTP access to external mail servers
In the end, let’s see the updates to be made that enables sending any HTML email template.
They contain:
- setting up additional headers telling that we created an HTML email, which compliant with the MIME standard
- reading the contents of an HTML file (though we could also insert it in the PHP script directly)
- providing the
$headersto the mail function
$headers = "MIME-Version: 1.0" . "\n";
$headers .= "Content-type:text/html;charset=UTF-8" . "\n";

$htmlContent = file_get_contents("email_template.html");

// send email HTML
mail($to, $subject, $htmlContent, $headers);
If you assign the HTML directly to the $htmlContent variable in the script, it's important to avoid mixing single and double quotes. Otherwise, you'll be notified of a parse error of the mistake: PHP Parse error: syntax error, unexpected ' ...unrecognized string... ' (T_STRING) in ...PHP file location...
I also consider mail attachments an important topic but beyond the reach of this article, the following discussion may help to shed light on how to do it properly.
Sending HTML Emails with External PHP Packages
In the previous section, I mentioned that it’s not efficient to send emails with the PHP mail() function, considering multiple recipients as the function opens and closes an SMTP socket for each email sent. There are external PHP packages that handle these much better. These PHP scripts enable email sending with option for SMTP configuration of services like Gmail or Yahoo! Mail or other email service providers.
Most blog and community discussions on the web mention the PEAR Mail and the PHP Mailer packages as the default go-to in these situations, so I introduce these as well.
PEAR Mail Package
PHP Extension and Application Repository (PEAR) is a framework and distribution system for reusable PHP code components. The most important email sending script within PEAR is the Mail package. Based on the installed PHP version, you may already have PEAR available. You can check it running pear with no arguments in the command line. If you followed the installation steps recommended in the first section, the command will return:
The program 'pear' is currently not installed. You can install it by typing: sudo apt install php-pear warning. That's totally fine and exactly what we need to do.
Once that's done, we can start adding pear packages: we will need sudo pear install Mail and sudo pear install Net_SMTP for sending emails through email delivery services. You can find the PEAR Mail packages documentation here.
First, we reference the necessary PEAR component in our .php file:
require_once "Mail.php";
Next include the SMTP settings for the email delivery service in variables, with Gmail it looks as follows:
        $host = "ssl://smtp.gmail.com";
        $username = 'username';
        $password = 'password';
        $port = "465";
        $to = "saroy.mihaly@gmail.com";
Please note, that the $host variable also holds the security protocol. Here, the username and password are supposed to be your actual Gmail account's username and password. If you use your script on the web, for security reasons, you would store these credentials in environment variables and include them programmatically in the script. PHP dotenv is a popular package to help with this.
You need to disable 2-step verification for the SMTP authentication to work in Gmail.
The second part of our code is to provide the parameters to the email header and the variables for SMTP authentication to the mail function. With PEAR Mail package it looks as follows:
        $headers = array ('From' => $email_from,
            'To' => $to, 'Subject' => $email_subject,
            'Reply-To' => $email_address);
        $smtp = Mail::factory('smtp', array ('host' => $host,
            'port' => $port, 'auth' => true,
            'username' => $username, 'password' => $password));
        $mail = $smtp->send($to, $headers,
            $email_body);
If you examine it closely, that's where this external PHP package outperforms the original PHP mail() method besides that it enables SMTP: there you could only work with string variables, here you can use arrays for setting the $headers and the various parameters.
Here you can see the full example:
        <?php
            require_once "Mail.php";

            $host = "ssl://smtp.gmail.com";
            $username = "username@gmail.com";
            $password = "*****";
            $port = "465";
            $to = "recipient@edmdesigner.com";

            $email_from = "example@edmdesigner.com";
            $email_subject = "Subject line" ;
            $email_body = "whatever you like" ;
            $email_address = "replyto@edmdesigner.com";
            $content = "text/html; charset=utf-8";
            $mime = "1.0";

            $headers = array ('From' => $email_from,
                            'To' => $to,
                            'Subject' => $email_subject,
                            'Reply-To' => $email_address,
                            'MIME-Version' => $mime,
                            'Content-type' => $content);

            $params = array  ('host' => $host,
                            'port' => $port,
                            'auth' => true,
                            'username' => $username,
                            'password' => $password);

            $smtp = Mail::factory ('smtp', $params);
            $mail = $smtp->send($to, $headers, $email_body);

            if (PEAR::isError($mail)) {
            echo("<p>" . $mail->getMessage() . "</p>");
            } else {
            echo("<p>Message sent successfully!</p>");
            }
        ?>
Moving on, next we'll see an even more robust implementation of PHP mailing with the compound PHP Mailer framework.
PHP Mailer Package
The contributors of this PHP mailer class say it’s the most popular code for email sending and let’s be honest: the almost 5 million downloads seem to support this statement quite well. It has detailed documentation on the available methods and a few examples to help you get started.
The Mailer package may be downloaded or cloned from Github and the script set up manually in projects, or if you prefer to be neat, use the PHP dependency manager - Composer.
Getting Started with Composer
Composer is very similar to the Node Package Manager in the JavaScript world: you can install and maintain project dependencies in a simple and controlled way from a central registry. They both provide a huge library of public packages.
Composer uses Packagist as the main repository for these packages and the composer.json file put at the root of your project's repository instructs Composer. You can install it with curl -sS https://getcomposer.org/installer | php. To use Composer you need PHP 5.3.2+. After this command finished running, you can add PHP Mailer package to a composer.json file. The simplest way of doing so, if you add the packages by Composer's bootstrap process: composer init.
You'll be asked a series of questions during the setup guide, one of which will be to select the dependencies:
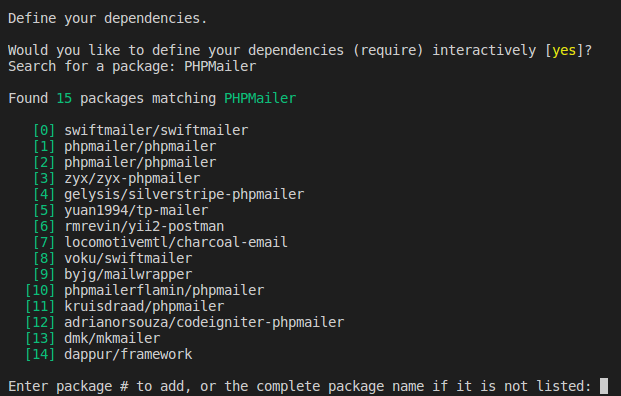
If you completed the setup guide as above, you can check if the package name and the current default version is added to the composer.json file: "phpmailer/phpmailer": "~6.0".
Now you only need to install the added project dependencies (in this case just PHP Mailer) with composer install. It'll add a vendor/ folder supplied with vendor/autoload.php script generated by Composer and the required dependencies.
Using the PHP Mailer Package
As we use Composer and have vendor/autoload.php out-of-the-box, it is much simpler to include the external library in our project:
      require "vendor/autoload.php";
      use PHPMailer\PHPMailer\PHPMailer;
      $mail = new PHPMailer;
and we are good to go.
On the PHP Mailer's $mail object, we set the properties used for sending mails: $mail->From = "from@domain.com";. There are helper methods in the process: addAddress addReplyTo, etc.
If you wish to send HTML email, and you'd probably want to, then set $mail->isHTML(true).
Sending along any attachment - such as an image - is really easy using the PHP Mailer script. You only need to call the mail object's addAttachment() method passing the file location to the argument as a string value. That's very different from the pain of having to configure MIME header boundaries, like using PEAR or the mail() function
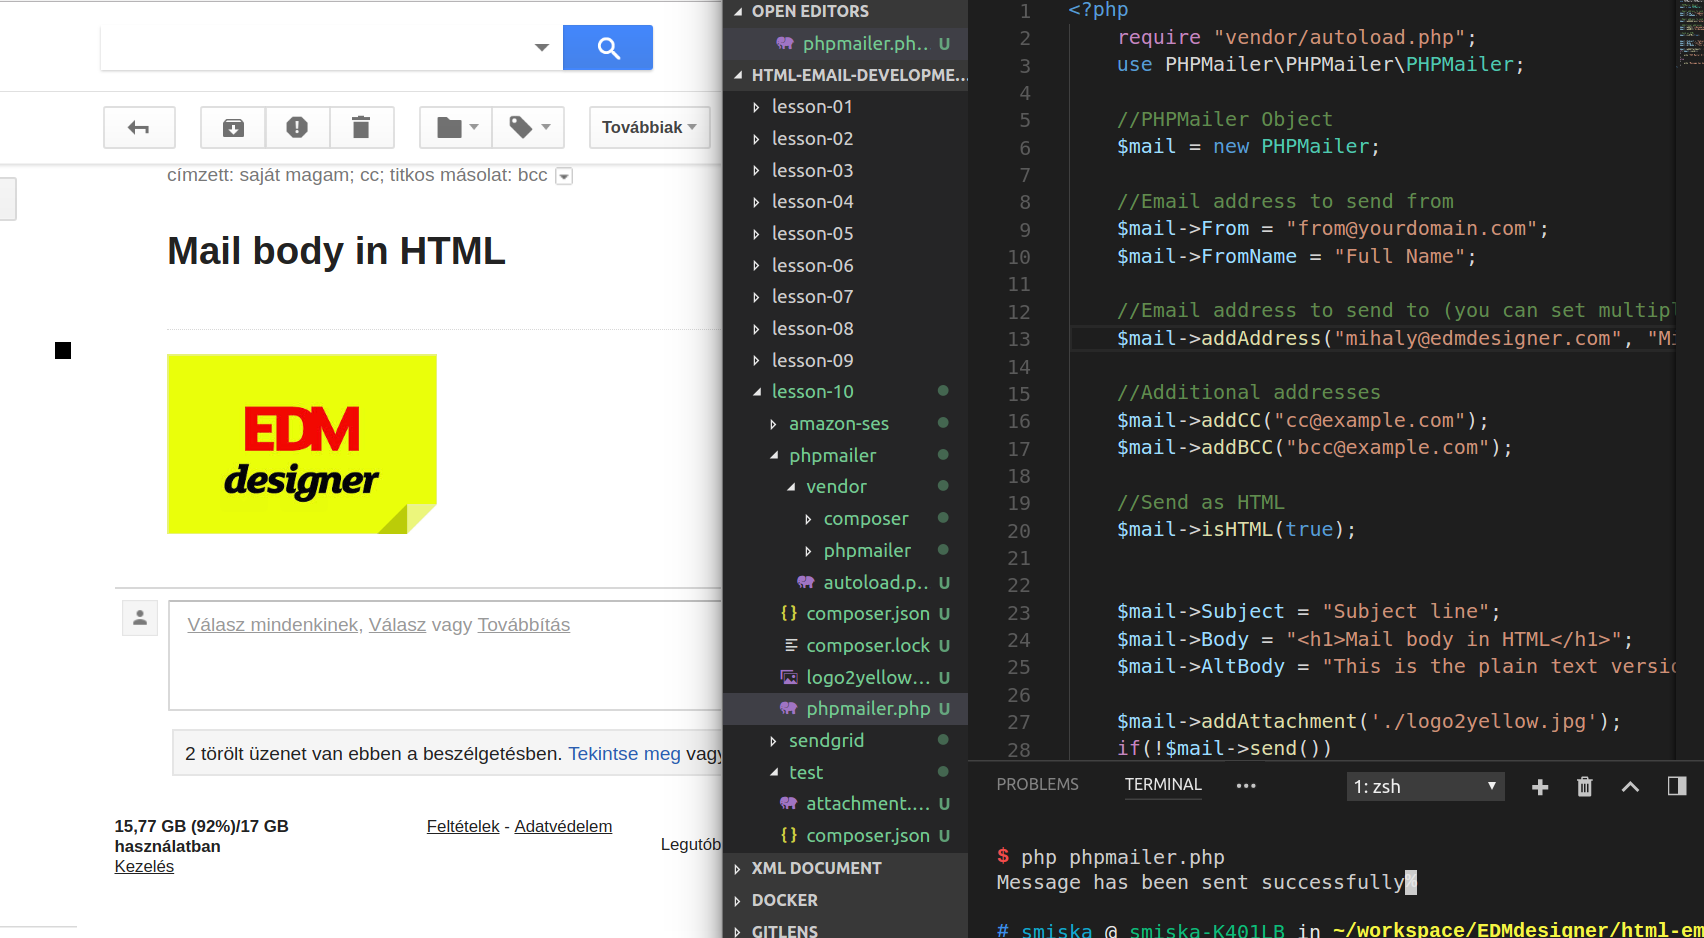
Once you provided all the necessary properties, you can send the email with $mail->send().
Summary
In this tutorial, you could learn about the most commonly used options to send out plain text and HTML email templates with PHP. We started the post with the PHP mail function and settings for the local PHP environment.
We continued exploring PHP code based mailer packages and gained knowledge about the PHP package and dependency management system with Composer. We saw the example of Gmail on how to configure an SMTP mail server with these mailer packages.
This article focused on the possibilities strictly derived from the PHP ecosystem. Though we can send complex HTML emails to multiple recipients now, we can achieve a lot more through specific email delivery services. For this reason, we continue the topic with email delivery API services using PHP.
Thanks for your attention this time. Stay tuned.