Every now and then you hear that only machines will produce programming code in the near future. Computers are taking over. It may be frightening or challenging, depending on the perspective. But don't worry, there is still some time for the transition and thus it's really advantageous to take control and learn about how code generation tools work.
In this article we'll show you tools that help to create robust email code based on presets. Small, yet important steps to the rise of computer domination in development.
Throughout this post, we'll be talking about Campaign Monitor's background and button code generators - well-known in the industry - and examine their advantages. Following these, we'll be showing two layout generators: one we created in-house and one found in our research.
By learning about these tools, we focus on quality and maintainability aspects of email development. We can use tools written by others or we can write them ourselves matching the best practices. We'll be able to leverage the controlled quality to always have the expected outcome.
In this tutorial series, we started off with generally-applicable improvements to anyone's email development workflow. As we have now a grounding knowledge on the basics, we dive into customized applications. By signing up, you can be an insider at EDMdesigner and look behind the scenes. Don't miss out on the chance!
Code Generation Tools
As mentioned in the introduction, the big idea behind code generation tools is that you have bulletproof code snippets that can take parameters and generate code accordingly. You'll be sure that the code will work in the email clients you want to support and the process will save you time. That's the case with backgrounds.cm and buttons.cm, so let's look at them first.
Background Generator
Supporting background images is somewhat tricky in email. You either want to insert them in specific areas or apply in the full email body. Based on your choice, you'll have different considerations. The backgrounds.cm tool has a solution for both:
Full Email Body Background Image
You can look at Campaign Monitor default code for background images when they are applied to the full email body below:
<div style="background-color:#7bceeb;">
  <!--[if gte mso 9]>
  <v:background xmlns:v="urn:schemas-microsoft-com:vml" fill="t">
    <v:fill type="tile" src="https://i.imgur.com/YJOX1PC.png" color="#7bceeb"/>
  </v:background>
  <![endif]-->
  <table height="100%" width="100%" cellpadding="0" cellspacing="0" border="0">
    <tr>
      <td valign="top" align="left" background="https://i.imgur.com/YJOX1PC.png">

         CONTENT

      </td>
    </tr>
  </table>
</div>
The considerations for full body background images are as follows:
- As many clients block images by default, there's a
background-colorproperty in theDIVelement as a "fallback color". You probably don't want blank, white backgrounds to show in marketing emails, so you can define fallback colors to be displayed in those situations. - Generally speaking, it's a good idea to have fallback colors for the cases where images are disabled. However, where the message is forwarded and the fallback color is defined on the email body, this color is applied to the forwarded message's email body as well. That's normally not preferable, especially with dark backgrounds (that's why this phenomena is called "Black reply"). The backgrounds.cm tool uses a wrapper
DIVelement to avoid "Black Reply". - Word-based Outlooks (2007/10/13 and Windows 10 Mail) don't support background images at all. You can only include them with encoding, meaning that the image is given in code. The one used for Outlook clients is VML. These are the parts surrounded with conditional comments (
<!--[opening/closing part of the conditional statment]>). This is definitely a distinct advantage of the tool. - The VML design's architecture is not easy to master. You can get familiar with it with the helpf of this tutorial or by using Microsoft's official documentation.
- According to Freshinbox's blog post (and confirmed by our visual testing) Outlook.com and Office 365 don't support the
background-imageproperty inDIVtags. The tool takes care of the problem by the use of the inner table. - The
tablecontainer's childtdholds the background image for "ordinary" email clients. Please note that this is the most robust way of including background images. If you have doubts, check out our blog post where we showed it step-by-step. We use a different approach to full email body background images, you may be interested in reading about it too.
With properly set up VML and background attributes in the td elements, you can support almost all clients.
Litmus test results for Backgrounds.cm in the email body
You can check out the full source code of this step on Github
A Single Cell Background Image
Below you can see the code generated by the tool for a single cell:
<td background="https://i.imgur.com/YJOX1PC.png" bgcolor="#7bceeb" width="120" height="92" valign="top">
  <!--[if gte mso 9]>
  <v:rect xmlns:v="urn:schemas-microsoft-com:vml" fill="true" stroke="false" style="width:120px;height:92px;">
    <v:fill type="tile" src="https://i.imgur.com/YJOX1PC.png" color="#7bceeb" />
    <v:textbox inset="0,0,0,0">
  <![endif]-->
  <div>

     CONTENT

  </div>
  <!--[if gte mso 9]>
    </v:textbox>
  </v:rect>
  <![endif]-->
</td>
The highlights here are:
- This setting has two additional sets of parameters (besides fallback color and image source settings).
You can customize thewidthof the cell with a toggle to fit the email width, and adjust theheightwith a different toggle to the content height. The latter is far more interesting, because in addition to providing the previously missing dimension, it adds astyle="mso-fit-shape-to-text:true". - We also find a separation of "for Outlooks" and "for other clients". The VML version of the background image is placed inside the table cell and is applied in desktop Outlook clients. The background from the wrapper
tdis picked up by all the other email clients.
The background tool is a wonderful tool relied on by many email developers. From this short introduction, you could see how it works and if you run visual tests, you can experience it's great client coverage as well. We had our test by inserting the generated code in our boilerplate email template that uses the Drop Calc Method:
Litmus test results for Backgrounds.cm in single cell
You can check out the full source code of this step on Github
However, you may lack the option to use the tool offline in your workflow. The project is not open-sourced in a way that you could include it in your own projects programatically.
The other thing we miss out on is the support for retina background images. We've read about them before, and though it's only a thing for progressive clients yet, it would be nice if you could choose an option for them or be able to develop this feature on the basis of the existing tool.
Button Generator
Clickable Call-To-Action buttons are very important in email marketing that makes a bulletproof button generator, like Campaign Monitor's invaluable.
There are four basic button types: VML-based, Padding-based, Border-based and Padding + border-based buttons. You can look up these buttons, if you need more understanding about them. Last year we tested all and made some improvements yielding a fifth button type: the Line-height Based Bulletproof Button. Building upon the practical experiments from the last article, we'll conclude why the Buttons.cm generator is a great tool to use.
For appetizers, this is what the generators default code looks like:
    <div>
    <!--[if mso]>
        <v:roundrect xmlns:v="urn:schemas-microsoft-com:vml"
            xmlns:w="urn:schemas-microsoft-com:office:word"
            href="https://edmdesigner.com"
            style="height:40px;v-text-anchor:middle;width:200px;"
            arcsize="10%" strokecolor="#1e3650" fill="t">
        <v:fill type="tile" src="https://i.imgur.com/0xPEf.gif"
            color="#556270" />
        <w:anchorlock/>
        <center style="color:#ffffff;font-family:sans-serif;
            font-size:13px;font-weight:bold;">
            Show me the button!
        </center>
        </v:roundrect>
    <![endif]-->
        <a href="https://edmdesigner.com"
        style="background-color:#556270;
        background-image:url(https://i.imgur.com/0xPEf.gif);
        border:1px solid #1e3650;border-radius:4px;
        color:#ffffff;display:inline-block;
        font-family:sans-serif;font-size:13px;
        font-weight:bold;line-height:40px;
        text-align:center;text-decoration:none;
        width:200px;-webkit-text-size-adjust:none;
        mso-hide:all;">
        Show me the button!
        </a>
    </div>
Your first instinct may be to run away while you can, but I promise that this snippet is simple (for most parts) and therefore wonderful.
The notable parts:
- It's basically structured into two buttons: one for Outlook clients with VML, and a regular HTML button for regular email clients as we saw in the background section
- VML is used for supporting desktop Outlook clients like with the background tool before. It's hidden for any other clients than desktop Outlooks as its conditional comments is only parsed by Outlook.
- The regular HTML button consist of a
DIVcontainer element, and anatag, which hasdisplay: inline-block, so it can apply the specifiedheightandwidthfor the link. The whole thing gets hidden by themso-hide:all;property in desktop Outlooks. - The button can use a background image, which is a nice option to have. However, if the email client doesn't load images by default, the defined
background-colorwill be visible.
If you check the theory around which this button is built, it's very similar to EDMdesigner's Line-height Based Button. It also doesn't have padding or margin properties to stretch the button's dimensions, but uses the line-height on the a tag and the width property.
See the Line-height Based Button's code below:
<table width="100%" border="0" cellspacing="0" cellpadding="0">
<tr>
<td>
<table border="0" cellspacing="0" cellpadding="0">
<tr>
<td bgcolor="### COLOR ####" style="#### STYLES ####;
-webkit-border-radius:3px; border-radius:3px;"
align="center">
<a href="### HREF ###" target="_blank"
style="### FONT PROPERTIES ###;
text-decoration:none; line-height:54px;
width: 150px; display: inline-block;">
<p style="### FONT PROPERTIES ###;
line-height:54px;">
I am a button →
</p>
</a>
</td>
</tr>
</table>
</td>
</tr>
</table>
The main difference comparing the two lies in the use of VML and DIV elements (these we could omit).
As far as support goes, the only clients left out are: old Lotus Notes, Outlook.com and Office365. All the other clients seem to display the button.
Litmus test result for Buttons.cm
You can check out the full source code of this step on Github
Now, last but not least let the simplicity of the below UI convince you to try this tool next time:
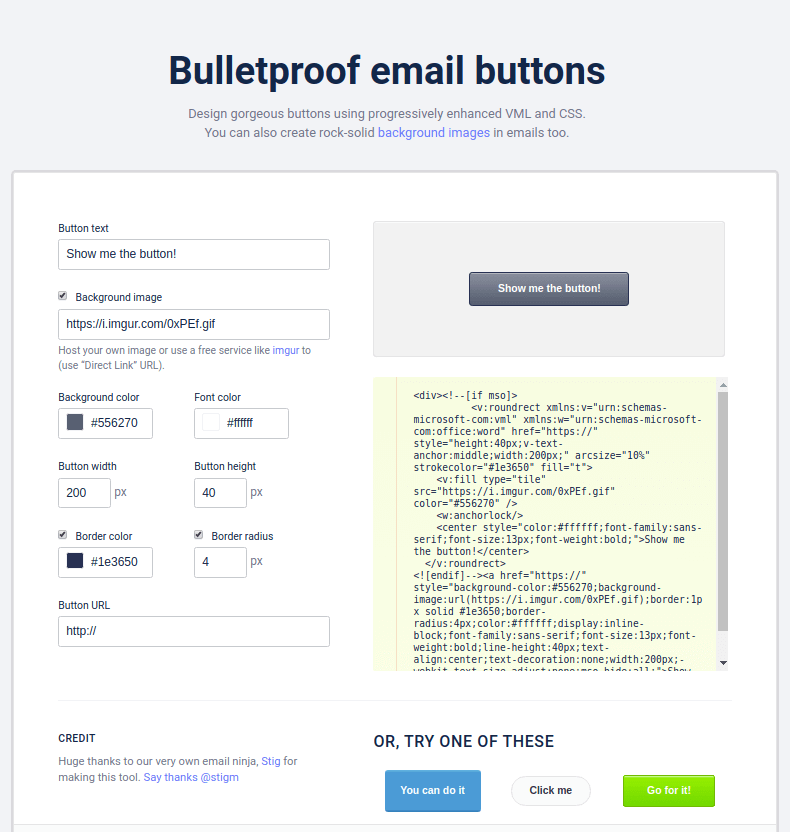
In this section we analyzed the code of the bulletproof button generator and we have seen the advantages it has. By the above image, you can see the available parameter options for customization. You can design beautiful buttons easily.
From the point of flexibility, we miss the option to select which button type you would want the generator to use. For example, if you don't need support for desktop users, the VML part is totally unnecessary, which can make your code more easier to use and much shorter.
Layout Generators
We won't dive into the very details with layout generators, but there are two tools worth mentioning besides the several layout code generators for the web. One is an offline tool, which with certain customization can be truly powerful (you may see that in our article about automation), the other is an online tool ready for use.
With these last pieces, you have most of an email covered. You have tools to generate the layout, background images and bulletproof buttons.
EDMdesigner's TableGenerator.js
The first tool is the one we introduced in a previous tutorial. Our goal was to show, how you would start creating a code generator by yourself with JavaScript. In the post we showed a simple script, capable of creating multi-column layouts with Node.js based on command line parameters.
node tableGenerator.js 1 2 3 > index.html
You can check out the full source code on Github.
There are many options to improve the tool above. For simplicity's sake, we didn't customize it to high email client coverage with email specific styles and markup, but it can be done with little effort and some coding skills. Feel free to use the code from the article and make a custom tool of it for emails!
Email Layout Calculator by Julie Ng
We're going to visit another layout tool lastly, created by a fellow email geek who we respect very much: Julie Ng. You can access the tool following this link.
Now if you check it out, you can learn quite a handful and you'll get the help you need to design the layout. You get a description on how the tool works, why it uses the properties it uses, and you can customize your desired layout and see the generated code update on the fly.
Julie also published an article detailing how her tool was designed and what clients it supports.
A two column, 600px wide layout with 4px separator line would look like this:
    <!DOCTYPE html PUBLIC "-//W3C//DTD HTML 4.01 Transitional//EN"
    "http://www.w3.org/TR/html4/loose.dtd">
    <html lang="en">
    <head>
    <meta http-equiv="Content-Type" content="text/html; charset=UTF-8">
    <meta name="viewport" content="width=device-width, initial-scale=1">
    <!-- So that mobile will display zoomed in -->
    <meta http-equiv="X-UA-Compatible" content="IE=edge">
    <!-- enable media queries for windows phone 8 -->
    <meta name="format-detection" content="telephone=no">
    <!-- disable auto telephone linking in iOS -->
    <title>Email Layout Calculator</title>

    <!-- Included CSS for non gmail clients -->
    <style type="text/css">

        /* Level Two: reset mobile gmail first gutters */
        .col-first-td {
        padding-left:  4px !important;
        padding-right: 2px !important;
        }

        .col-last-td {
        padding-left:  2px !important;
        padding-right: 4px !important;
        }

        /* Level Three: use mobile gutter */
        @media screen and (max-width: 599px) {
        .col {
            width: 100% !important;
            max-width: 100% !important;
        }

        .col td {
            padding-left:  2px !important;
            padding-right: 2px !important;
        }
        }
    </style>
    </head>
    <body bgcolor="#ffffff" leftmargin="0" topmargin="0"
    marginwidth="0" marginheight="0">

    <!-- Level One CSS (inlined): the mobile gmail
    first (but still works in Outlook) markup -->
    <table width="600" border="0" cellpadding="0" c
    ellspacing="0" align="center" id="container">
        <tr>
        <td>

            <!--[if mso]><table width="100%" border="0" cellpadding="0"
            cellspacing="0"><tr><td valign="top" width="300"><![endif]-->

            <table width="100%" border="0" cellpadding="0" cellspacing="0"
            align="left" class="col" style="width:100%;max-width:300px;">
            <tr>
                <td class="col-first-td" style="padding-left:4px;
                padding-right:2px">
                Column 1
                </td>
            </tr>
            </table>

            <!--[if mso]></td><td valign="top" width="300"><![endif]-->

            <table width="100%" border="0" cellpadding="0" cellspacing="0"
            align="left" class="col" style="width:100%;max-width:300px;">
            <tr>
                <td class="col-last-td" style="padding-left:2px;
                padding-right:4px">
                Column 2
                </td>
            </tr>
            </table>

            <!--[if mso]></td></tr></table><![endif]-->

        </td>
        </tr>
    </table><!--/#container-->

    </body>
    </html>
It's important to note that you can:
- Set the layout
widthto any desiredwidth, you are not limited to the long-standing tradition of600px - The tool was created with concerns for email clients on mobile devices and as it was created before the big Gmail update last year, it has special focus on Gmail.
For easier understanding about how the layout work, we added the following code to the beginning of the embedded styles:
    * {
        border: 3px dashed black;
        padding: 10px;
    }
It highlights each element, so it's visible how the layout is structured.
Litmus test results for the layout code
You can check out the full source code of this step on Github
Despite all of the very positive aspects, we still have the same wishes about the generator as before: the ability to customize the generation for specific client list, the ability to work offline and with that: to be able to add it to an existing workflow or modify to our own use cases (or possible email client improvements).
Summary
Throughout the article, we introduced 4 code generation tools and showed you why you may want to use them.
We reviewed some useful characteristics of the bulletproof background and button tools of Campaign Monitor.
We saw how they support desktop Outlook email clients with VML and that they have regular HTML for high client support in other email clients. We also gathered the customization options and saw their effect in the applied properties.
Next, we saw two layout generator. With the first, our aim was to show you an example on how to start developing a code generation tool and give you a reusable code base that you can modify. The second was a simple tool, which helped to create layouts that considers mobile email clients and provided helpful comments on the key aspects of the code.
These tools have high reliability as they are created with well-defined and tested conditions, based on real life experience with the various email clients. The bulletproof code snippets are usually customized with parameters and thus offer the advantage of speeding up the development process as well.
We hope you enjoyed the topic and that you'll join us next time. We also welcome questions and ideas you may have and inspirational thoughts for others.
In the next article,we're going to continue with code modifier tools developed in-house at EDMdesigner. Get the next post in your inbox by signing up.